How to Format a Flashdisk on Windows & Mac
Do you already know how to format a flash drive correctly on Windows or Mac? If not, then you must listen and follow this tutorial article carefully.
There are many choices of storage media that we can use. For example, an external hard drive, micro SD, or flash. However, when viewed from the functionality and portability, the flash still dominates between the two others. Flashdisk is one of the practical storage media with a small size and is portable.
In this article, we will discuss how to format a flash drive. There are several ways to format the flash that you might be able to use. The first is through Windows Explorer (the most common way), the second is through CMD, the third is through disk management and the fourth is through powershell. Although this tutorial is specifically for Flash Drive Storage devices, this tutorial can also be used for various other types of storage media.
Important Attention Before Format Flash
When the capacity of the flash is full, rather than having to delete the contents of the data one by one, it is more efficient to do a complete erasure or what is better known as format
By formatting , you will delete all files in the Flashdisk without exception. So, for those of you who don't know how to format the correct Flashdisk, first consider some general information such as:
- File System NTFS dan FAT32
- Allocation Unit
- Format Options
- Volume Label
1. File System NTFS & FAT32
You already know four different file systems: NTFS , FAT, FAT32 , and exFAT. So what's the difference between a file system and which one should you choose when formatting a flash?
The advantages of NTFS over FAT and FAT 32:
- Read/write files larger than 4 GB and up to maximum partition size
- Create partitions larger than 32 GB
- Compress files and save disk space
- Better space management = less fragmentation
- Allows more clusters on larger drives = less wasted space
- Add user permissions to individual files and folders (Windows Professional)
- An-the-fly file encryption using EFS (Encrypting File System; Windows Professional)
Advantages of FAT 32 Compared to NTFS:
- Compatible with virtually all operating systems
- Takes up less space on USB drive
- Less disk writing operations = faster and less memory usage
exFAT Dibandingkan FAT & FAT32 :
- Read/write files larger than 4 GB
- Create drive partitions larger than 32 GB
- Better space management = less fragmentation
2. Allocation Unit Size
Allocation Unit Size is a small portion of storage given to the system to accommodate the writting process on the Flashdisk. The larger the partition space you allocate, the better the system performance will be in reading files on the Flashdisk.
So you can set these options depending on your needs. If you want to save a large file size, then maximize the allocation size for better performance. If you want to save files in medium or small sizes, then the small allocation size will not be a problem.
But usually, the user will leave this option set in its default state.
3. Format Options
By default, the Quick Format option will be checked. This feature allows Flashdisk to be erased quickly without deep scanning. Conversely, if you remove the check mark on this option, the system will do a deep scanning of the flash. But unfortunately, this takes longer than the Quick Format option
4. Volume Label
Volume label is the name that will be used by Flashdisk, so you can enter any name you like. But there are some limitations based on the type of file system selected, including:
- NTFS , maximum 32 letters, will be displayed in upper or lower case as typed.
- FAT , maximum 11 letters, cannot use special characters (*?.,;: / \ | + = <> []), All displayed letters will be capitalized.
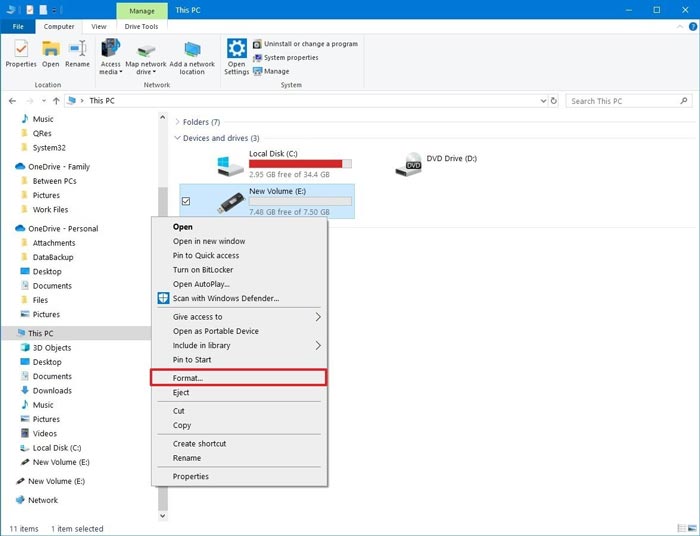
How to Format Flashdisk via File Explorer
- Plug in the USB drive or Flashdisk to be formatted.
- Open Windows File Explorer
-
Then log in to This PC (or Computer or My Computer )

- Find the Flashdisk drive (for example G :), then right click> Format
-
You can set it for, File system , Allocation unit size , Volume label , and Format options .

- Then just click Start , wait, and press OK
- That's how to format a flash via file explorer in Windows 10. It's very easy!

How to Format a Flashdisk Via Disk Management
- Open Start.
- Search Disk Management and click on the top result to open the program.
-
Right-click the USB flash drive and select the Format option.

- In the " Volume label " column , type a label to name the flashdisk in File Explorer.
- Use the " File System " menu and select the NTFS option. (You can also select the “FAT32” or “exFAT” option.)
- In the " Allocation unit size " drop-down menu , use the Default option .
-
Check the option Perform a quick format .

- Click the OK button.
- That's how to format a flash via Disk Management in Windows 10. It's very easy!


How To Format Flashdisk via Command Prompt
The flash disk format process via CMD can solve the problems that occur when using the previous method (via File Explorer). This method is also effective for overcoming write protected flash drives, many viruses, or flash drives that display the wrong / reduced amount of capacity than they should.
1. Flashdisk format in CMD the usual way
There are 2 ways to format a flash via CMD in Windows 10. Namely using the usual method (manual) and with the help of Diskpart. You can format the flash with the quick format method or full (full) using the Command Prompt, follow these steps.
- Open the Start Menu .
-
Look for Command Prompt,
then right click select
Run as administrator.

-
Type the command below to run
quick format and press Enter 2 times.
Format VOLUME: /v:FLASHDRIVE-LABEL /fs:FILE-SYSTEM /q
In the command, make sure you replace VOLUME with the correct storage drive letter. FLASHDRIVE-LABEL with the name you want the drive to appear in File Explorer. Then FILE-SYSTEM with one of the available file systems, including FAT32 , exFAT , or NTFS (recommended).
Example: this is how to quickly format the E drive:
Format E: / v: workFlash / fs: NTFS / q
-
Type the following command to perform the full format (not quick
format) of the USB flash drive and press Enter (twice).
Format VOLUME: /v:FLASHDRIVE-LABEL /fs:FILE-SYSTEM
Example of Drive E's full format command:
Format E: / v: workFlash / fs: NTFS

2. Format Flashdisk in CMD via Disk Part
To clean and format a USB thumb drive with Command Prompt, use these steps.
- Open the Start menu.
- Search for Command Prompt. Left click select the option Run as administrator.
- Then, Type diskpart command to open Diskpart tool and press Enter .
- Type the command list disk to see a list of available drives and press Enter.
-
Type the command
select disk DISK-NUMBER
to select the flash drive and press
Enter .
Note : In the command, make sure to replace DISK-NUMBER for the correct number that represents the drive you are formatting.
Example : select disk 1 - Type the command Clean to delete all partitions and press Enter .
- Type the command create partition primary to create a primary partition and press Enter.
-
Next, Type the command
format fs = FILE-SYSTEM label = DRIVE-NAME
quick
to do a quick format and press
Enter .
In the command, make sure to change NTFS for the file system of your choice, workFlash for the name you want to give the device, and if you don't specify the quick option then the full format will take place.
-
Examples of how to quickly format a flash using the NTFS file system:
format fs=NTFS label=workFlash quick
- That is how to format the flash via CMD Diskpart. Very easy!

Type the command assign to assign a drive letter and press Enter.
Note : you can add letter = e to the command to set E as the drive letter. Otherwise, the system will assign the drive letter automatically.
Type the exit command to end diskpart and press Enter.
How to Format Flashdisk via PowerShell
Similar to the Command Prompt, you can use PowerShell to quickly format a flash disk to erase its contents. Or you can also use command-line tools to remove content and fix the problem.
1. Usual Flashdisk Format
Follow these steps for How to Format a Flashdisk using the PowerShell command.
- Open the Start menu .
- Find PowerShell and right -click select Run as administrator.
-
Type the following command to perform a quick format on the flash drive
and press
Enter .
Format-Volume -DriveLetter DRIVE-LETTER -FileSystem FILE-SYSTEM
Under Command, make sure to replace DRIVE-LETTER with the correct letter on the drive you want to format, and FILE-SYSTEM for FAT32, exFAT, or NTFS (recommended).
Example : run fast format drive E:Format-Volume -DriveLetter E -FileSystem NTFS
-
Type the following command to perform the full format on the USB flash
drive and press
Enter.
Format-Volume -DriveLetter DRIVE-LETTER -FileSystem FILE-SYSTEM -Full -Force
Example of running full format E drive:
Format-Volume -DriveLetter E -FileSystem NTFS -Full -Force
2. How to Format Flashdisk via Powershell Get-Disk
To clean and format the flash with the PowerShell command, use the following steps.
- Open the Start menu .
- Search for PowerShell and right click select the option Run as administrator.
-
Type the following command to view the flash drive you wish to repair
and press Enter.
Get-Disk
-
Type the following command to erase volume and press
Enter.
Get-Disk 1 | Clear-Disk -RemoveData
-
In the command, change the DISK NUMBER to the correct number and
represent the flash drive you are formatting.
Example of selecting and cleaning disk number 1:Get-Disk 1 | Clear-Disk -RemoveData
- Type Y and press Enter .
-
Type the following command to create a new partition and press
Enter .
New-Partition -DiskNumber DISK-NUMBER -UseMaximumSize
In the command, change the DISK NUMBER to the correct number and represent the flash drive you are formatting.
Example of creating a new partition using all available space on drive number 1:New-Partition -DiskNumber 1 -UseMaximumSize
-
Type the following command to perform a quick format and assign a drive
label, and press
Enter :
Get-Partition -DiskNumber DISK-NUMBER | Format-Volume -FileSystem FILE-SYSTEM -NewFileSystemLabel DRIVE-NAME
Change the DISK-NUMBER command to correctly FILE-SYSTEM for NTFS , FAT32, or exFAT, and DRIVE-NAME with the name of the device you want in File Explorer.
Example of selecting and formatting drive number 1 using the NTFS file system:Get-Partition -DiskNumber 1 | Format-Volume -FileSystem NTFS -NewFileSystemLabel workFlash
-
Type the following command to assign a new letter to the drive and
press
Enter .
Get-Partition -DiskNumber 1 | Set-Partition -NewDriveLetter E
How to Format a USB Flash Drive on Mac
Mac users can also easily format the usb storage. Namely using a program called Disk Utility. This program works just like the Disk Management in Windows, you can use it to erase (format), restore, partition and unmount it.
Then how do you format the flash on Mac OS? You can follow the steps below:
- Connect the flash on the MacBook
- Open the Applications folder and click " Utilities "
-
Click " Disk Utility ". The Disk Utility window will appear on the screen

- Click the name of your flashdisk on the left in Disk Utility
- Click the " Erase " tab that appears at the top of the Disk Utility window
- Then, click the menu next to " Format "
- Choose the format you prefer.
- Type the name of the Drive in the "Name".
-
Click the " Erase " option . Wait for the formatting process to finish.

- Please click " Done ".
- The process of formatting the flash on a Mac has been successfully carried out.


In the format section, there are various options that you can choose from. Here's the explanation:
- Mac OS Extended (Journaled) , this is a file system format for Mac, namely HFS Plus Journaled. If you select this option, then the flash drive can only view its data when connected to a Mac. The flash drive will also not be readable when connected to a computer with the Windows operating system.
- Mac OS Extended (Case-sensitive, Journaled) , partitions to be case-sensitive, meaning that "CERTAIN '(uppercase) folders / files will be considered different from" certain "(lowercase) folders.
- Mac OS Extended (Case-sensitive, Journaled, Encrypted) , generally the same as the options described earlier. However, there are additional passwords and encryption on the case-sensitive journaled partitions.
- MS-DOS (FAT) , this is a universal file system that can be accessed on a Mac or PC with a Windows operating system, supports various versions of legacy operating systems, but has a fundamental weakness, namely that it cannot deal with files larger than 4GB in size.
- ExFAT , newer than MS-DOS (FAT), supports files over 8GB, and can be used on volumes larger than 32GB. It's just that because it's newer, ExFAT doesn't support older Mac OS X under version 10.6.5 and also older versions of Windows under XP SP2.
How to Format Write Protected Flashdisk
How to Overcome Write Protected Flashdisk with CMD
- Connect the flash with the computer.
- Open Command Prompt as Administrator.
- Type the command diskpart .
- Then the command list disk , and select disk (number) , replace me with the appropriate number for the flash.
-
Type attributes disk clear readonly , after finishing type clean command .

- Type list volume and select volume which says unusable
- Then type the format fs = fat32 or the format fs = ntfs according to the desired disk format.
- After that type exit .

How to Overcome Write Protected Flashdisk with Registry Editor
If using the Command Prompt is not successful, the user can overcome the write protected flash with the Registry Editor (Regedit). To use Regedit to solve the write protected flash disk problem, here are the steps:
- Open Regedit by pressing Windows key + R and typing Regedit followed by the Enter key
- Enter the HKEY_LOCAL_MACHINE section then SYSTEM then CurrentControlSet look for Control and enter StorageDevicePolicies
-
Look for the WriteProtect option , right click on the option and select
Modify

- Then change the value data to 0 , and click OK
- If so, unplug the flash, restart the computer, and plug the flash back in to format it


Comments
Post a Comment